With the absolutely enormous amount of people on Facebook, over 70% of users reporting being on at least once a day, the platform is an obvious choice as a potential paid social media advertising goldmine. That being said, if you can’t effectively track your social media ad campaign performance, you’re missing out on maximizing your Return On Ad Spend (ROAS).
This brings us to the creation of the Facebook Pixel. The Facebook Pixel pairs a KPI with ad performance to give more accurate data on your Facebook ads conversion rate.
Amongst a myriad of other benefits, the Pixel also allows you to create custom audiences based on site traffic. This can save your ad dollars by letting you create custom audiences who have already taken a desired action and excluding them from retargeting.
Any brand running paid social media advertising campaigns on Facebook should absolutely have a Facebook Pixel installed. Wondering how to set up a Facebook Pixel on your website? It’s not as difficult as you may think.
There are three primary methods for how to install a Facebook Pixel:
- Manually copy and paste the code into your site header
- Use a Tag Manager Plugin (if your site supports these)
- Have a web developer take over once you’ve created your Facebook Pixel and have them install if for you
Steps for How to Set Up a Facebook Pixel
Getting the most out of your Facebook ad campaigns requires you to be using the Facebook Pixel. It might sound complicated but we promise it isn’t! Here are 5 steps for how to set up a Facebook Pixel and take your Facebook ads to the next level:
- Create a Facebook Pixel
- Install the Facebook Pixel on your website
- Turn on Facebook Pixel advanced matching options
- Choose an event code
- Confirm your Facebook Pixel is active
How to Create a Facebook Pixel
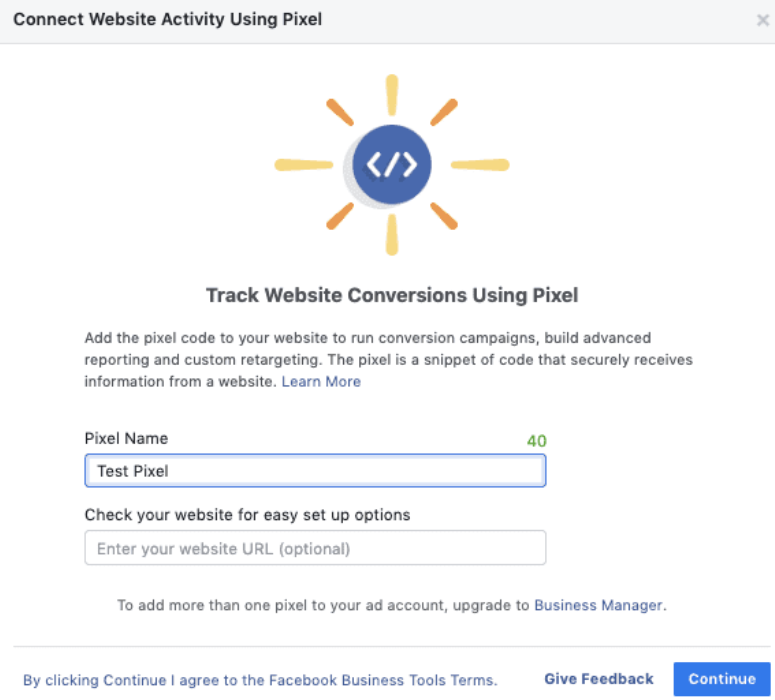
To set up a Facebook Pixel, first launch Facebook Business Manager. On the left-hand side, navigate to the Pixel section and create a new pixel. Now you’ll be prompted to give your Pixel a name. Choose something memorable you’ll be able to recognize as you’ll want to assign your new Pixel to the right Facebook ad account in order to be able to use it on Facebook ad campaigns. .
After you’ve named your Pixel and added a website URL, click the create button and a pop-up box will take you to the “Install Pixel” setup. Congratulations, you’ve learned how to create a Facebook Pixel!

Installing a Facebook Pixel on Your Website
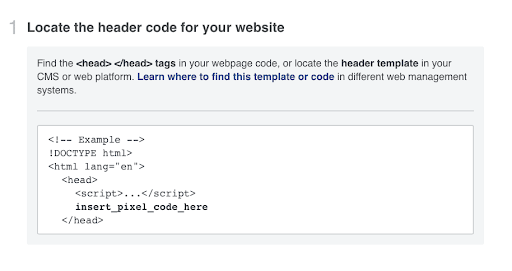
It’s now time to install the Facebook Pixel. On the “Install Pixel” pop-up, choose to manually install the code yourself. Facebook will automatically generate the Pixel code for you containing your Pixel’s unique 15-digit ID. Copy the entire Pixel code and make your way over to the back end of your website.
In your website header, locate the <head> </head> tags. Paste the Facebook Pixel code just above the </head> tag. This can go above or below any existing tracking tags you may have already installed in your site header such as Google Analytics.
That’s all there is! You’ve now successfully learned how to install a Facebook Pixel on your website.

Facebook Pixel Advanced Matching Options
Now head back to your Facebook Business Manager and look at the bottom of the “Install Pixel” pop-up box. There you’ll see a toggle option for “Turn on Automatic Advanced Matching.” While this may not be necessary for everyone, it’s crucial for those focusing on generating leads that can be later repurposed into e-commerce campaigns.

Installing a Facebook Pixel Event Code
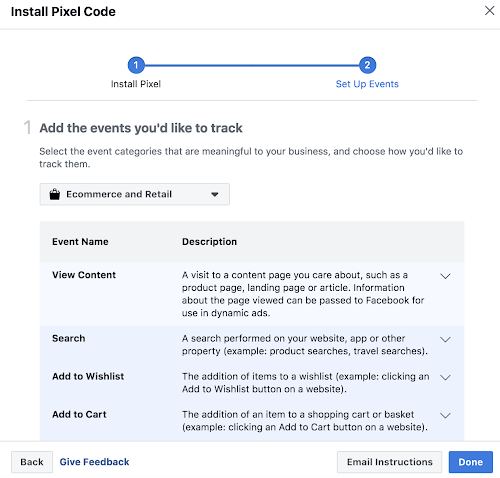
After you’re finished with the “Install Pixel” pop-up box, click next. You’ll see a dropdown box with a wide selection of event categories from which to choose as well as how you’d like to track them (which actions users take: view content, add to cart, etc.).
When you select an event category you’ll be presented with a small piece of code you can now install on any page of your site you choose. This code will allow you to track and record actions taken by Facebook users on those pages.
There lies the true power of the Facebook Pixel and why it’s so crucial to running any social media paid advertising campaign. There are a multitude of events to choose from and your selection will be dependent on what you’re looking to achieve.

Make Sure Your Facebook Pixel is Active
This final step may take up to 30 minutes to register, so don’t worry if your Facebook Pixel doesn’t read as active right away. To check on the status of your Pixel, open Ads Manager and click on “Pixels.” You’ll be able to check the status of your Pixel next to its name.
Until your Facebook Pixel registers as active, no data will be collected. Additionally, you can verify your Pixel is functioning by downloading the Google Chrome Facebook Pixel Helper Plugin.
Learning how to set up a Facebook Pixel on your website will give you even more powerful data-measuring tools while running Facebook Ads. Use this powerful tool to maximize your ROAS with real-time analytics. If you have any issues, retrace these steps or visit the Facebook information page for installing a Pixel.
Now that you’ve got your Facebook Pixel installed, learn how to create Facebook Ads that convert.
